Stencilled paisley floor
09:24I'm so excited to show you this post guys, I love this floor fully, totally, 100%. It's been the bane of our lives since we moved in, it took around 32 hours to do. (not including preparing the sub floor). But love it we do!
This post is really wordy and really picture heavy so here's a look at what's waiting at the end!
Let's start at the start and then we can end at the end of the beginning. Because of course our office has so much more to be done to it!
When we viewed the house, the reception room here that we are using for an office was a pool table room with a grotty chewing gum littered and stained beige carpet. The room had big round casino style steps.
 |
| This is how it was when we viewed the house |
 |
| The first day we had the keys. Dus doesn't hang about! |
 |
| Our Pinsperation! |
I found two paisley stencils on Etsy and decided on the one from OMG Stencils because it was the cheapest. Including shipping it came to around £35 and was here within 2 weeks. I hadn't expected it to arrive so soon! The other was more like £50 and was a bit more floral paisley. I liked the cheaper one more. Anyway, onto the doing.
As you can see from the photo above, the subfloor was pretty unpretty! We decided to lay 6mm MDF on top and redesign the steps. Actually I lie, the steps was nothing to do with me, Dus decided that on his own and once he'd pulled them apart I couldn't really say no. Besides, they came out quite far into the room and with a business and a hobby seamstress both vying for space, we would need all the room we could get!
So Dus re did the steps out of wood we already had. And then we moved in.
 |
| Nice squared steps in the foreground there |
He then started to lay the large MDF sheets down ensuring that they overlapped any sub floor joins so that there wouldn't be too much movement when it was all finished.
It took him quite a while to do this because, surprise surprise, the room isn't square or level and the corners are not 90 degrees.
He countersunk screws along all of the edges of the boards and then filled the gaps and the screw holes.
 |
| It was at this point where the steps blended into the rest of the floor we realised we would need to make sure they contrasted enough for us not to fall down them! |
 |
| We have since discussed the dangers of sanding without a mask. |
Then it was up to me to clean the floor up and get to work painting. I used a barely damp old flannel to wipe the floor down (I did the skirting board too seeing as I was down there)
Kneeling on this dusty floor is kinda dirty, you will want to change into your painting clothes (what Dus and I call scraggers). Otherwise this is what will happen to your good jeans & slippers.
Anyway, so then once it had dried out and I got changed, it was time to paint. Don't do what we did. We used dark grey undercoat because it's what we had in the shed and we were trying to be thrifty. I did 3 coats. Then I started stencilling with white undercoat. About 2 hours in I realised it looked awful, it was sticky, smudgy, was catching on the stencil and overall a right pain in the neck.
So we sanded it back to almost before. This is where you'll want to catch up with us now.
The paint you want to use is plain matt emulsion. We used a dark grey for the background and a light grey for the stencilling.
I did 3 coats of the background dark grey to get a really good solid coverage.
 |
| I loved the matt texture of this, it was so beautiful and soft. |
 |
| I took this pic on the undercoated floor, not the emulsioned floor hence it being a little different. |
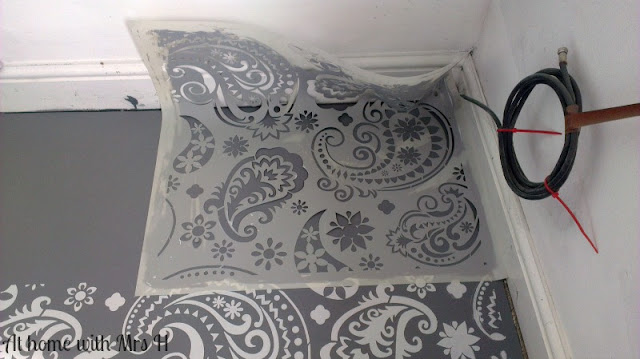
I discovered that it's easier to avoid smudges if you can do a stepped effect like this giving each square a couple of minutes to firm up before doing the one immediately adjacent to it. The stencil was really easy to line up thanks to squares in each corner.
I used a small foam roller, usually used for radiators and did one thick ish coat onto the stencil. Enough for good coverage, but not so much it was thick and would stick up from the floor when it was dry.
 |
| This is how much I got done in one day, it was around 6 hours work in total to do the stencilling with the sides & edges taking the longest. |
 |
There was one awkward corner and again I just painted as close as I could and it's not noticeable now.
We left the steps unstencilled to give a nice safe contrast when entering the room. It's not nice to not be able to see steps and go flying!
All painted, you can't even see the joins!
Next I used Ronseal Diamond Hard floor varnish in a Matt finish and did three coats. I chose matt over satin or gloss because I didn't want the joins in the boards to show up when the light hits and I didn't want it to be too shiny as the sun comes in and you wouldn't be able to see the design too well.
 |
| Somehow managed to varnish my toe! |
Because we pulled the carpet out of this room there was a small gap around the base of the skirting and where we laid the boards so we purchased some 12mm pine quadrant beading and then I glossed it white. We also purchased a silver metal right angle and a silver metal threashold thingy (I lost the receipt so I can't tell you what it is!) to go between the laminate in the living room and this painted MDF.
Dus got to work sticking the beading to the base of the skirting board all around the room. Wooden floors can have some movement so you'll want to just stick it to either the floor or the skirting, not both. We could have nailed it but then we'd have to fill the nail holes and paint again and this beading won't see much action as our furniture will be against the walls.
That's it, the floor was finished. Dus decided to sweep the floor one last time to get rid of beading sawdust and I thought his sweeping method was so amusing I took a photo for you. Dus is very efficient and likes to exercise his full reach when sweeping.
So ta-da, the floor was done! The varnish was re-coatable in 2 hours but we still left it a good 24 hours before moving things into the room just to be on the safe side.
In total this floor took us around 32 hours and is not for the faint hearted. However, look at what we got in return! I'll break down the time and costs below in case you're thinking this is something you'd like to do.
Approximate Hours:
Laying MDF - 8 hours
Filling MDF - 2 hours
Sanding floor - 2 hours
(I won't include our foray into oil based paints because that would be ridiculously long!)
Painting the basecoat - 2 hours per coat = 6 hours
Stencilling - 6 hours
Varnishing - 6 hours
Finishing - 2 hours (Including the metal step edges)
Total hours: 32
Costs:
MDF - £75
Emulsion - £30
Varnish - £40
Stencil - £35
Beading, threashold & metal step edging - £40
Total cost: £220
What do you think, was it worth it? Do you love it as much as I do? I bet you do!


24 comments
Omg I absolutely love it!!!!!!!!!
ReplyDeleteWell ... blimey. Stunning. I have to admit, if you had said what your plan would be beforehand, I would have thought: "Hmm. Really. Okay." But the end result is stupidly good! Fair dues to both you and Dus.
ReplyDeleteWithout trying to sound too brown-nosey (shifty-eyes left and right), I think your version turned out better than your pinspiration.
It's a bold design element which seems to nicely define both you and Dus perfectly ... "stylishly retro."
Hmm, yes. I approve. You may carry on. ;0)
Oh yes; extra points too for one: Going to all that effort in the first place and two: writing up a full post for your blog-followers/Blogites.
What she said!
ReplyDeleteThat is such a clever and well done floor. I am in awe. It is EXACTLY what I have been wanting to do to a floor and I LOVE paisley. Loving it and envious all at the same time... I know weird, it's a floor. At least if I ever get to do this I will know where to go for tips. Congrats on such a happy floor. You will smile every time you see it now.
oops... I started my comment when there was one comment and then got distracted before coming back to complete it. In the meanwhile the was another comment.
DeleteOh my gosh, Samantha, how awesome is that?!!! Beautiful and amazing!
ReplyDeleteI don't think we've ever moved into a house that was square and plumb. Always a pain when trying to do something like that.
ReplyDeleteFirst off, the floor is GORGEOUS!!!
I learned two things from this post. 1)That you are talented and ambitious
2) That I'm a lot lazier than I was previously willing to admit.
:-)
Samantha that is one gorgeous floor! I love the paisley (I am a sucker for paisley anyhow), but on the floor is WOW! We have concrete slabs here and hubby is going to rip out the living room carpet and paint the floor. I am going to show him the paisley floor and see what he thinks. I painted my concrete sewing room floor red (no stencil), but now you got me thinking about stencils. Thanks so much for sharing this.
ReplyDeleteWow! I don't know that I've ever seen such an awesome floor! You are amazing!
ReplyDeleteOMGosh! I am in love with your floor. And I am so impressed with your patience and ability to do it. Unreal awesome you and Dus are. I love it! Now you have me thinking about my home .... hmmmm, wonder if ... but then reality hits and I realize I'm so stinking lazy :) For reals though, GREAT job and I love it!!
ReplyDeleteWow that looks fantastic! You both have awesome DIY skills! :D
ReplyDeleteBeautiful! That's an intense amount of work, but it surely has paid off!
ReplyDeleteIt looks fantastic!! It looks like so professional!
ReplyDeleteWell done! I really like it!
You two are very patient!
Susie
Gosh....that is one AWESOME floor!!! I really feel inspired to do some serious decorating once all our renovating work is done ....And boy you are so right that houses are never square, especially older ones! Ours is an outright NIGHTMARE! LOL In our previous house, it had old wallpaper and once that was removed, it left a real MESS underneath....the plasterboard was so rough and uneven, so I used a sea sponge and two different shades of paint, the base was matt and the sponging was a low sheen....(or was it the other way around! Hmmmm....LONG time ago, I can't remember!) ....anyway it worked out really great to hide the imperfections....but now I must say I have stencilling on my 'to do' list and I must admit I never thought to use it on the floor! Definitely worth all that effort!!
ReplyDeleteChristine
ChrisW Designs
Samantha, that's absolutely beautiful! Your hardwork (and husbands) really paid off!
ReplyDeleteooo, love your floor! I can't imagine I'd have the patience to do it, especially not to do it twice!
ReplyDeleteWow these are amazing! You guys did a great job!
ReplyDeleteNow following! :)
Dianna
Wowsers, simply fantabulous Samantha - you and Dus did an amazing job! I really want a floor like that now:)
ReplyDeleteHugs, Estelle xx
This is crazy cool and awesome! I have to give you credit because after the first attempt that wasn't working, I probably wouldn't have stuck with the idea. Lucky you (that you had the grits to stay with it and make a second go at it), because it looks so great!
ReplyDeleteHaving now seen it in the fkesh. I have to say WOW its fantastic !
ReplyDeleteHaving now seen it in the fkesh. I have to say WOW its fantastic !
ReplyDeleteoh wow, I really do love it, it's just incredible! I think you got your timings wrong though:
ReplyDeleteBuy MDF. Leave in corner for 3 years
Laying MDF - 8 hours
Filling MDF - 2 hours.
Abandon project for 6 months
Sanding floor - 2 hours
Painting the basecoat - 2 hours per coat + 10 days between coats as painting makes me cry = 6 hours
Stencilling - 6 hours
Varnishing - 6 hours
Leave project for 3 months
Finishing - 2 hours (Including the metal step edges)
Total hours: 3 years, 9 months, 20 days and 32 hours
The floor turned out fantastic! I love this idea. The stencil design is timeless and the colors you chose are really lovely.
ReplyDeleteThanks for sharing,
Suzanne
Pieced Pastimes
Beautiful! I'd love if you'd like up to The DIY'ers: http://homecomingmn.blogspot.com/2013/05/the-diyers-and-some-favorites.html
ReplyDeleteoh so much work and now so feminine! love it
ReplyDelete