
Sew Along Week 3: Create top handles and backpack straps
08:00
Create handle tabs
To create these tiny handle tabs, fold under the short ends on the top handle tabs (G) 1/4” (6mm) and press into place. Fold the tabs in half, short ends together and stitch along the two edges with a 1/4” (6mm) seam allowance. Turn the tabs right side out and press well. Place to a side for the moment.
Step 1 - press

Step 2 - sew sides

Step 3 - turn right side out and press

Good! Now on to the handles!
Before starting the handles, my tip is to give your pieces a generous spritz of spray starch and wait a few minutes for it to sink in. This will make life so much easier and your creases crisper!
Fold one of the top handle pieces (K) into half lengthwise and press into place. Unfold. Fold the bottom and top raw edges to meet at the centre crease line. Press into place.
Fold the handle in half again encasing the raw edges and top stitch along each long edge with a 1/8” (3mm) seam.

Once you've sewn the handles, place the end of one handle (K) into one of the tabs (G) as far as it will go, and stitch along the open end, sewing in place. Repeat for the other end and then the other handle. Put to one side for the moment.

Create the back strap support
With right sides together, sew the long edge of the strap support piece (E). Turn right side out and press, then baste the short sides and place to a side for the moment.
Sew the back straps
Fold the back straps (I) into half lengthwise and press into place. Unfold. Fold the bottom and top raw edges to meet at the centre crease line. Give it a good press. Next, fold the back strap (I) in half, back on itself, along the centre crease.
Stitch along each short edge with a 1/4” (6mm) seam. Trim the corners of the short edge. Turn right sides out, tucking the raw edges inside. Push the corners out and then press well to create a fully enclosed handle.


Isn't that neat? Now top stitch along all 4 edges.
Now to the tricky bit!
Thread one of the rectangular rings
through one of the back strap
connectors (J), fold over 1” (2.5cm) and stitch to secure in place. Repeat for the second back strap connector. You may find it easier to stitch this with your zipper foot.
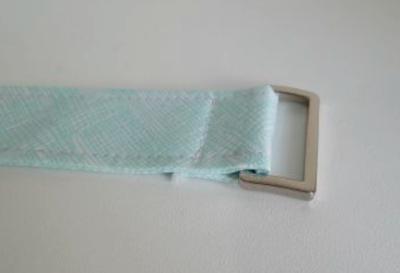
Next, thread one end of a back strap (I) 1” (2.5cm) through the triglide buckle and stitch to secure.

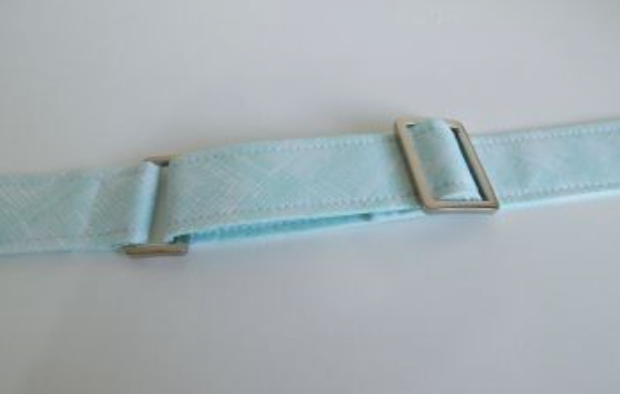
Thread the loose end of the back strap (I) through the rectangular ring on the strap connector (J). If the rectangular ring has a right side, it should be facing up.

Thread the back strap piece (I) back through the triglide buckle over the existing strap and out the other end.

Check if your buckles are correctly placed!
For more detailed instructions please see my tutorial on how to make adjustable straps.

connectors (J), fold over 1” (2.5cm) and stitch to secure in place. Repeat for the second back strap connector. You may find it easier to stitch this with your zipper foot.

Next, thread one end of a back strap (I) 1” (2.5cm) through the triglide buckle and stitch to secure.

Thread the loose end of the back strap (I) through the rectangular ring on the strap connector (J). If the rectangular ring has a right side, it should be facing up.

Thread the back strap piece (I) back through the triglide buckle over the existing strap and out the other end.
Check if your buckles are correctly placed!
For more detailed instructions please see my tutorial on how to make adjustable straps.


1 comments
You always make it sound so easy! Loving my camera bag turned purse, by the way!!
ReplyDelete