Hi Lovelies,
There's been such a positive reception to my retreat pattern collection, thank you so much for your kind words! Today we're sharing the first batch of the tester pics from the Fiesta Tote.
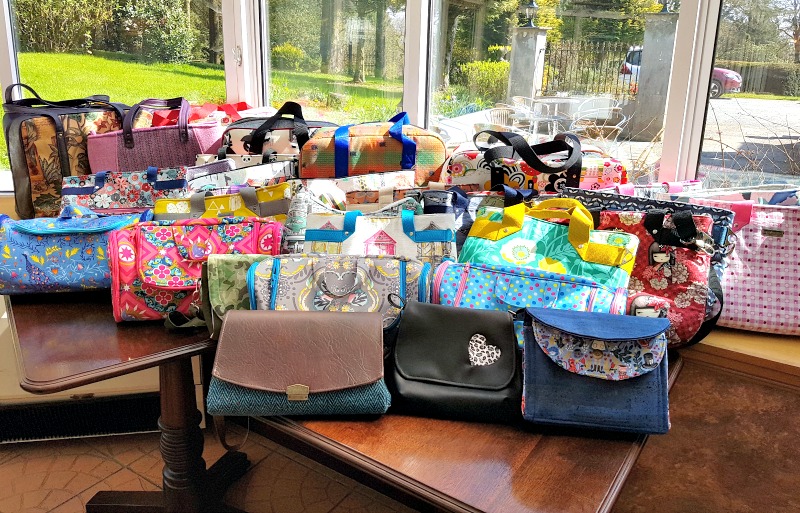
The Fiesta tote is perfect for beginners, or for those who want a quick and satisfying sew. It's easy to modify and they all look so different, just with different fabric choices!
First up is Agent Bushy with her whimsical Fiesta. I loved it so much I bought it from her!

Next up is Anna from Messy Rooms who made this beautiful Fiesta tote, I love the hot pink straps!

Annette went wild with strips using her fabric for her outer, lining AND her straps, I love it, and it really makes a feature of the shape of the bag!

Barbara didn't let me down and created this bag all in pink to make us all wink! I love it! I love her large pocket on the front too, it really works so well!

Christine from Bags by Bags of Style took this pattern to 'hack' it as far as she could for the retreat. In this version she used faux leather to colour block it and added some blingy hardware in between the straps!

Cyndi chose to make a bag that'll stand out from the crowd with this version with a stunning hot pink lining and strap. I love it!

Emma from Emkie Designs chose my favourite colour, grey, for her Fiesta tote, it's such a versatile bag made up in these fabrics!

Evey from Sew Evey used this fab bird print linen and matched it perfectly to her webbing straps. She's done a great job!

Jana from Bubo Boutique used shiny silver webbing for her handles and strap, it's stunning and really makes the handles the feature of her Fiesta Tote, it's a gorgeous sew!

Jayne also went to town on style and chose this gorgeous print with grey handles, such a classy bag!

Katie placed her fabric perfectly to make a feature of the gap between the handles, it looks gorgeous. I love her handles, it really stands out well, thanks Katie!

Laura from Totes Adorbs took her bag on an adventure with this fun 'The World' print, she even added a key hook to the inside, so practical!

Leslie from Love Rubie added this stunning paper pieced panel to the front of her bag and added some red accents for a rock and roll vibe. I am kinda jealous of her bag....

Lynn from She Wears Red Feathers made two versions, the first was in this cute panda/flowers print with black handles. I love how she's framed her 'handmade' label with black to help it stand out.

Lynn's second version is business on the outside, pretty on the inside. The handles on Lynn's bags are so neat and precise, I can just see this bag on a shopping date!

If you'd like to make your own version, you can find the pattern here on my store, or as part of the Retreat patterns bundle.